Using Review Tables
Learn how to create review tables to compare agreements, extract key information, or summarize trends at scale.
Last updated: Oct 19, 2026
Important: As part of ongoing Harvey II updates, you may see a different experience in your account than what's shown in this article. Please refer to the Harvey II Overview for the latest on what's rolling out and when.
Overview
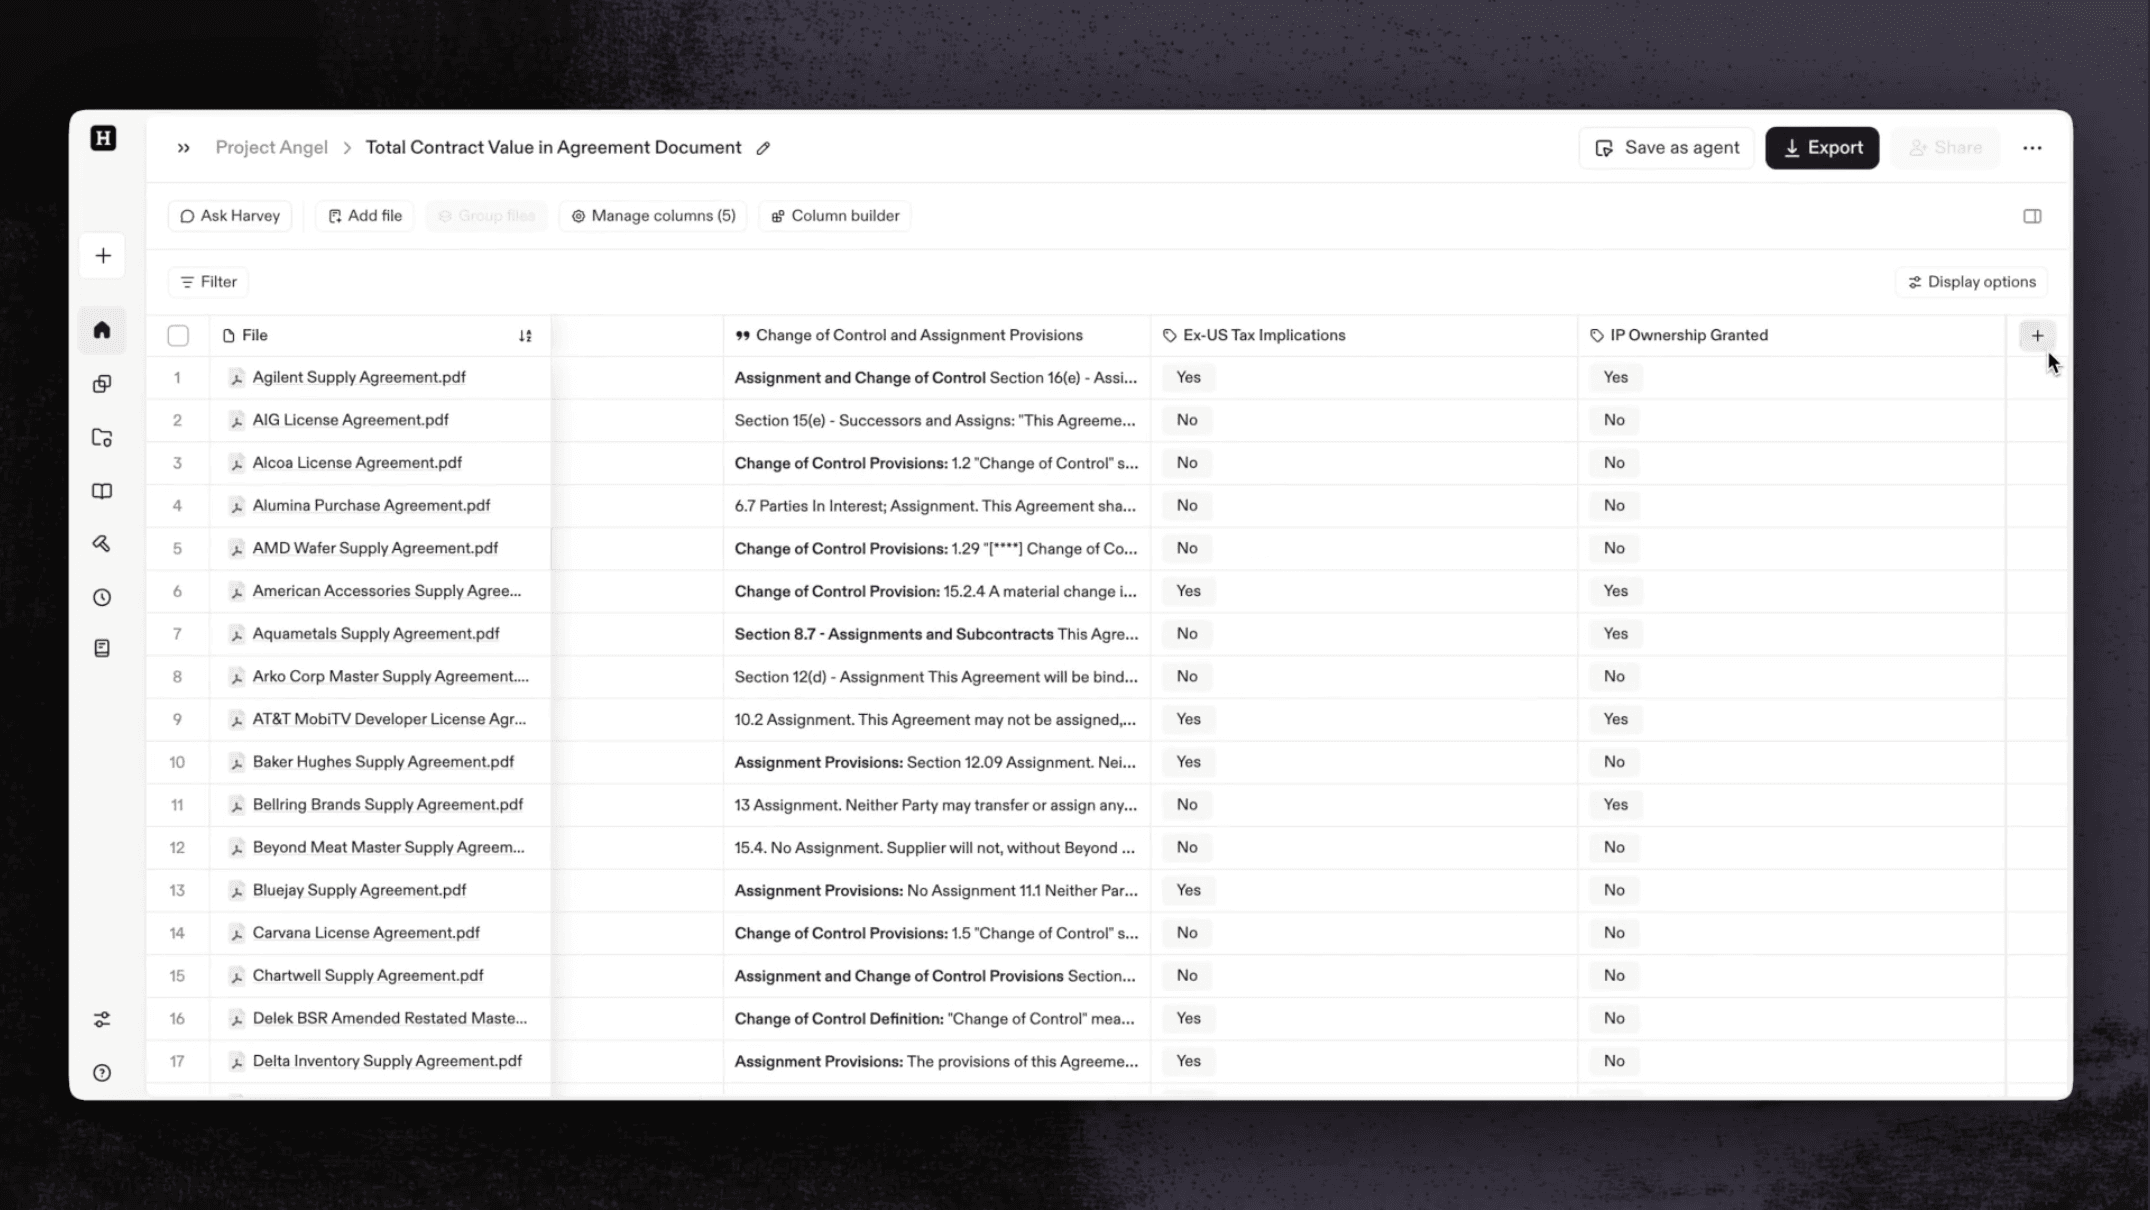
Review tables allow you to analyze many documents at once and output that analysis into a consistent, structured table view.
This guide walks you through creating and organizing a review table, assigning reviews, and asking follow-up questions using Assistant.
Video Overview
Creating and Editing a Review Table (May 2026)
Creating a Review Table
You can create a review table from Harvey’s main menu, from the Review Tables page, from Assistant, from directly within a vault, from existing Vault review table rows, or from an existing template.
If you haven’t created a review table yet, you can also navigate to the Review Tables page from the main sidebar menu to see an intro video and use case examples personalized to your practice area.
Important: To generate a review table, your files must come from a single source. All files must all come from the same Vault project or all be uploaded from a computer. If files come from mixed sources, Harvey will produce a static table instead of a review table.
- In the sidebar menu, hover over the Review Tables option and select the + button.
- You’ll be prompted to get started by selecting one of the following options:
- Upload files
- Use a Template
- Add from Vault
Create From the Review Tables Page
- Select
 Review Tables from Harvey’s main sidebar menu.
 - Select + Create Review Table or Start from template to get started.
Create From a Harvey Thread
In a thread, you can ask Harvey to create a new review table.
Harvey will ask you which documents you’d like to include in the review table, then ask what information you’d like to extract from each document. Harvey will then build a the review table and present it to you.
Tip: When creating a review table in a thread, you can ask Harvey to generate an output in same prompt, such as a summary, memo, or chart. For example: "Build a review table across the case file with date, actor, event, and citation, then give me the chronology."
Create From a Vault
- Open a vault or create a new one.
- Select + New in the upper right corner, then choose New review table.
- Select the files you want to include.
- Select Add files. A new review table opens containing the selected files.
Tip: You can add up to 10,000 Vault files to a review table. If you're working with a high volume of files, adding them to a Vault first is the best approach, since direct uploads from your computer are limited to 50 files.
Create From an Existing Vault Review Table
Start a new review table with files from an existing Vault table. Your selected files will be copied into a new table so you can run a different set of columns against them.
- Open an existing vault review table and select the rows you want to carry over.
- Hover over Query in the black toolbar at the bottom of the screen.
- Select New review. A new review table opens containing the selected files.
Note: Only the files will be copied into your new review table. Columns and table instructions will not carry over.
Create From an Existing Template
If you or a colleague has already saved a review table as a template, you can start a new review table from that saved template to apply a predefined set of columns and table instructions.
- Select Review Tables in the sidebar menu.
- Select Use a template.
- Choose the template you want to apply. The new table opens with the template's columns and table instructions already in place.
- Add your files and run the columns.
Note: You can also browse your organization’s review table templates in your Library.
Building Your Review Table
Once you’ve uploaded files to your review table, add columns to begin analyzing the files. Each column contains a prompt that runs across all your files. There are two ways to build columns:
- Build columns with Harvey. Once your files are uploaded, a panel opens to the left of your review table and turns your plain-language request into columns for you. This is the fastest way to get started.
- Build columns yourself. Use the Column builder or + Add column buttons to build and configure each column manually.
You can move between the two at any time — the manual controls stay available whether or not you use the guided flow.
Build Columns with Harvey
When you add files to a new review table, a panel opens automatically to the left of your review table. Describe the columns you want in plain language, and Harvey builds them for you.
- Upload your files to the review table, from Vault or from your computer. The side-by-side panel opens automatically.
- In the panel on the left, build your columns by describing what you’d like to extract from each document.
- If your request needs clarifying, Harvey asks a follow-up question. Respond to refine your request, then confirm your columns and table instructions and run the table.
- Once results populate, you can ask Harvey about the review table's contents. See Ask Questions Over a Review Table below.
Build Columns Yourself
There are two ways to manually add columns to a review table:
- Use
 Column builder, best for building multiple columns at once
 - Use + Add column, best for building an individual column
Build Columns with the Column Builder
- Select Column builder.
- In the text box, describe each piece of information you want Harvey to extract, and from which types of documents.
- Select Generate columns.
- Review the suggested columns and edit or remove any you don’t need.
- Type: How the output displays in the table.
- Label: The column name.
- Query: The prompt each column runs across your files.
- Select Add columns to apply them to the table.
- After results populate, open Manage Columns to make further adjustments.
Build Columns with + Add Column
- In the column header row, select + Add column to the right of your last column.
- In the text box, describe the information you want Harvey to extract from your files.
- Select Continue.
- Harvey suggests a column label and formatting options based on your prompt. Adjust any of the following as needed:
- Label: The column name.
- Type: How the column’s output displays in the table, such as Date, Currency, or Number.
- Language: The language the column's output displays in. Note that if you select Verbatim as your cell output type, your selected language applies only to the cell’s reasoning; the cell’s answer will remain in the source document's original language.
- Model: The model Harvey uses to extract information for the column.
- Select Add column. Harvey will generate the new column based on your input.
Tip: When adding or editing a column, press the expand arrow in the top-right of the column popover to open a bigger prompt window with more room to write.
Add a Manual Input Column For Notes
Manual Input Columns let you add your own notes and context directly to a review table alongside extracted document data, so you can analyze, flag, and query both without exporting to a spreadsheet.
Use them to capture insights that cannot be extracted from documents, such as internal context, reviewer judgment, or deal-specific nuances.
- In the column header row, select + Add column to the right of your last column.
- In the text box, select Add manual input column.
- Enter a column name that reflects the type of information you want to capture.
- Select a column type:
- Free Response: Type your notes, comments or open-ended text into each cell.
- Classify: Define a set of classification labels for each document.
- Select Add column.
- Double click into the column’s cells to in-line edit to add text or add classification options.
Note: Since manual inputs are user-generated, they won’t appear in source citations or verification trails.
Text Formatting in Review Table Cells
Free Response columns support the following text formatting:
- Bold text
- Bulleted lists
- Numbered lists
You can format the text output in Free Response cells in two ways:
- Ask the Column Builder or a column query to format its response (for example, "list the key obligations as a bulleted list").
- Edit a cell and manually apply markdown formatting, such bolding a term by adding two asterisks before it (e.g.
**term**).
Note: Markdown formatting only applies to Free Response columns. Other column types (such as Date or Classify) do not support it.
Set Table Instructions
Table Instructions let you define a single set of rules that automatically apply to every new column you generate in the table. Set them once at creation or update them any time to keep outputs consistent across the entire table without repeating instructions in each column prompt.
Example Use Cases
To add instructions when creating a table:
- Create a new review table.
- Select Table Settings at the top of the review table.
- In the Instructions field, describe how you want every cell response to behave — for example, how to refer to parties, how to handle redactions, or what reasoning framework to apply.
- Select Save. All new columns generated in this table will follow your instructions automatically.
To view or edit instructions after creation:
- Select
 Settings at the top of the table.
 - In the Table settings popover, update the Instructions field as needed.
- Select Save.
Note: Updated instructions apply to all newly generated columns. Previously generated cells are not affected.
Set Default Language and Formatting

Table Settings let you define default language and formatting options that apply automatically to each new column you generate.
- Open a review table.
- Select Settings at the top of the table.
- In the Table settings popover, choose a default language and format (Date, Currency, or Number) for each applicable column.
- Select Save. These formatting options will become the defaults for new columns.
Attach a File as Column Context

If your column needs to reference a fixed document, like a playbook, regulatory framework, or standard form, you can attach a file as column context. Harvey automatically applies the file as context for every row.
You can attach or edit a column's reference file from wherever you’re building the column: a review table, when Harvey suggests a review table in a thread, in the Column Builder, or when adding a review table step to Workflow Builder.
To attach a file as column context:
- Start where you're creating or editing the column. You can attach a file from any of these places:
- In your review table — select +Add Column to add a new column, or select a column's header to edit an existing one.
- When Assistant suggests a review table in a thread — add or edit the column's file before the table is created.
- In the Column builder — after you select Generate columns, attach a file to any generated column before you select + Add column.
- In the review table step of Workflow Builder — add or edit the column's file while building a review table template.
- Select the
 File to attach a file. Note that the file must come from the same source as your rows, either from Vault or from your computer.
 - [Optional] In the column prompt, @ mention the file by name to direct how Harvey should use it. For example, "Compare against the relevant clause in @Privacy Policy" or "Identify deviations from @Standard Offer Letter."
- Run the column.
- Review the results. You can select a cell’s sources or open the document previewer to see how the column’s reference file contributed to a cell’s answer.
Note: Using a file as column context requires access to that file's source. For example, if a column references a file from Vault A, anyone using the agent needs at least view access to Vault A.
Sample Use Cases
Organize Your Table
Grouping related files makes review easier, especially when information is spread across documents. For example, you may have a core document and multiple documents containing related revisions. When you group them together, they’ll display in a single row, returning a single output for analysis.
- Select files from your table that you want to group together, up to 25 files per group.
- Select
 Group from the toolbar at the top of the review table.
You will now see each file group in its own row on your review table.
Tip: Hover over a group to preview which documents are contained.
Watch the video below to see how files are grouped, analyzed, and reviewed.
Adjust Display Options
Use  Display options to control how the following information appears in your table:
- Assignment: When selected, Assignment displays the cells that are assigned to yourself or other users.
- Verification: When selected, Verification displays the cells that have been verified by yourself or other users.
Adjust Table Wrapping

Use the table wrapping toolbar to control how text appears in your review table cells:
- No wrap: Keeps each cell's text on a single line. Text that exceeds the cell width is cut off, so rows stay uniform.
- Compact wrap: Wraps text to four lines of text within each cell.
- Full wrap: Displays up to 40 lines of text within each cell.
Save Your Columns as Templates
Once you've built a review table, you can save its columns and table instructions as a reusable template. This lets you apply the review table’s structure to a new matter instead of recreating it.
- Open the review table you’d like to create a template from.
- In the header menu, select Templates, then Save as template.
- In the Save as template popover, fill out all required fields.
- Select Next.
To apply a saved template to the table you're already in, open the Review Tables page and select Use a template from the header menu. You can also browse and reuse templates from Library.
Review and Verify Outputs
Vault's review features help teams ensure data accuracy and streamline collaboration when working with extracted table data.
Bulk Verify or Unverify Rows
Verify or clear verification on multiple rows at once instead of working cell by cell.
- Select the rows you want to update.
- Select Table in the black toolbar at the bottom of the screen.
- Select Verify or Unverify.
The verification status updates for every selected row. You can re-run this any time to adjust status as your review progresses.
Learn more: How to Edit, Verify, and Track Activity in Review Table Cells
Lock Cells
You can lock a cell (or multiple cells) to protect it from further edits, re-runs, verification changes, or flags by anyone else with access to the table. Locked cells are skipped when a column is re-run.
To lock a single cell, select it and choose  Lock from the popover.
To lock multiple cells:
- Select the rows you want to update.
- Select Table in the black toolbar at the bottom of the screen.
- Select Lock.
Any user with edit or full access can lock or unlock a cell.
Learn more: How to Comment, Edit, Verify, and Track Activity in Review Table Cells
Ask Harvey to Analyze or Edit Your Table
Create a Harvey thread directly inside any review table to ask questions over your extracted data or to make changes to the table itself.
Ask Questions
You can ask Harvey to:
- Identify key dates, parties, or terms across contracts.
- Surface patterns in negotiation histories.
- Summarize insights across agreements (for example, “Summarize the most recent agreements involving cloud service companies.”)
Harvey cites relevant table cells so you can verify the underlying data. You can export results or continue the conversation.
Tip: On larger tables (several thousand rows or more), broad questions that draw on the whole table may take longer to complete or may not finish in a single pass. For best results, narrow your question to specific columns or a filtered set of rows. You can also export the table to Excel and query the spreadsheet in a new thread.
Edit and Manage Your Table
You can also ask Harvey to make changes directly to your review table. Edit cells, add or delete rows and columns, group files, and more.
Learn more: Ask Harvey to Edit and Manage Review Tables
Steps to Start a Thread
- Open a review table.
- In the Ask Harvey panel to the left of your review table, enter your question or request.
- Send your query. Harvey answers your question or applies your requested changes.
Use a Review Table as a Query Source
Reuse data you’ve already pulled into a review table when starting a new thread in Harvey. Instead of exporting and importing your review table as a spreadsheet, you can attach the review table directly within your query and use it to answer questions, draft documents, or complete workflows.
If you aren’t sure which table you need, you can also describe it in plain language and Harvey will find and attach the matching table for you.
When adding sources to your query, You can also combine a review table with other sources, like uploaded files or Web search.
Note: The review table source only contains the extracted data from table itself, not the files within. To include those files in your query, please select those files as an additional source.
Attach a Review Table to a Query
To attach a review table manually:
- In the prompt text box, select Files.
- Select Add review table.
- Select up to one review table.
- Select Choose.
- Write your prompt and add up to two more sources of context.
You can also locate a review table using an open-ended query — for example, "Find my most recent review table" — and Harvey will find and attach the matching table for you.
Note: You can select review tables that you own (private) and review tables that are explicitly shared with you. Review tables that are shared to the entire workspace are not shown.
Add Sources to Your Review Table Query
- Create or open a review table.
- Open Ask Harvey.
- Add files or sources.
- Prompt Harvey. Ask questions referencing the new sources in addition to the review table data.
To share a review table with other users in your organization, select Share in the upper right corner of your screen.
Note: If your firm has ethical walls enabled, sharing is governed by the client matter attached to the review table. If a recipient is restricted from that matter, Harvey blocks the share and shows a message explaining why. Depending on your workspace configuration, you may also be prompted to attach a client matter number before you can share. Learn more in Ethical Walls in Harvey.
Export a Table
You can export your table to a spreadsheet by following the steps below.
- Select
 Export from your review table.
 - Choose an export file type (Excel, Word, or CSV).
- [Optional] Review the Export Options list and toggle on any relevant export preferences.
Note: When exporting as an Excel file, you’ll also have the option to highlight verified cells, highlight flagged cells, and include Classify colors in your export.
View & Manage Review Tables

You can search, filter, and sort all review tables from the Review Tables page in the sidebar menu in Harvey. This page lists every table you've created or that's been shared with you.
In the Review Tables page, you can:
- Search, filter, and sort your list of review tables by source, client matter, last activity, shared status, recency or name.
- Select the More options (•••) button on any table to star, rename, duplicate, or delete it.
Tips for Success
- Start with a small sample set to refine columns before scaling to a full document set.
- Use consistent column labels so collaborators can navigate the table easily.
- Group related files into folders before creating the table to simplify review workflows.
- Use the Column Builder or Magic Prompt in Assistant when you’re unsure how to phrase extraction queries.
- If one cell's answer looks off-target, you can re-run the individual cell’s answer instead of regenerating the whole column, leaving the rest of your table untouched.
- Lock cells you've finalized before re-running a column. Locked cells are skipped during review table re-runs, so your completed answers stay in place while the rest of the column updates.
FAQs
Was this article helpful?